When your sister requests a pumpkin cheesecake for her birthday, you are not NOT going to make a pumpkin cheesecake. Even if you don’t have the correct size springform pan. Even if you do not have a KitchenAid. If a pumpkin cheesecake in the middle of February seems wrong, I am here to tell you that there is no wrong time to make and eat a pumpkin cheesecake.

pumpkin cheesecake and moscow mules
I had my friend Martha Stewart (just kidding, she is not actually my friend, I just used her recipe) help me out with this one, and of course there were a few tweaks made. After spending to much of my time at Whole Foods lamenting over the inability to buy individual sticks of butter, I was finally ready to start the process.
First, the crust. Not a press in crust made with store bought cookies, but a roll-out-yourself crust made from scratch and tasting faintly of sugar cookie. As in, I would make this crust into cookies and eat them.
Ingredients (for crust)
- 6 T unsalted, softened, butter
- 1/3 C sugar
- 1 egg yolk
- 1 t vanilla (or a dash more, if you are me)
- 1 C flour (yes, I used white AP flour)
- dash o’ salt
Method (the original recipe instructs one to use a stand mixer. I however mixed by hand, while standing)
- cream the butter and sugar in a large bowl until light and fluffy.
- mix in egg yolk and vanilla.
- add flour and salt and mix until the dough just comes together. flatten into a disk and wrap in wax paper and refrigerate at least 30 minutes, or up to overnight (because of my time crunch I went for 30 minutes)
Part II.
When rolling out crust I like to do it in between 2 sheets of lightly floured wax paper. 1) it prevents a huge mess on the counter 2) it makes transferring it into a pan slightly easier.
- lightly butter the bottom and sides of a 10″ springform pan. Preheat oven to 350.
- in between 2 sheets of lightly floured wax paper, roll out the dough into a 10″ disk, about 1/4 of an inch thick. This should fit nicely into the bottom of your 10″ springform pan. Or, if you are me, it will fit more than nicely, with a little bit of extra going up the sides.
- freeze the crust for 15 minutes. Then bake for 12-15 minutes until its “firm and pale golden”
- remove from oven and let cool (completely is ideal, or nearly completely will work too)
Part III. The filling. Where the ancient electric hand held mixer begins to smoke and smell really funny.

2 batters
Ingredients
- 1 C pumpkin puree (I used the canned variety)
- 1.5 t pumpkin pie spice (in retrospect, MORE)
- 2.5 lbs cream cheese at room temp (or, if whole foods is out of CC, 2 lbs CC and .5 lb neufchatel cheese)
- 1 3/4 C sugar
- 1/2 C flour
- 3/4 C sour cream (any ideas for what to bake with leftover sour cream?)
- 1.5 t vanilla
- 1/4 t salt
- 5 eggs
Method
- preheat oven to 325. wrap the outside of your pan with 2-3 layers of aluminum foil. this is to prevent water from seeping into the pan when you bake your cheesecake in the water bath. the water bath adds moisture in the oven and helps prevent cracks. also grease the sides of your pan once more.
- in a small-er bowl mix pumpkin puree with spices. set aside.
- cream the cream cheese until light and fluffy. this need not be an arduous process if you have the proper mixing equipment.
- gradually add the sugar and flour until smooth. add the sour cream, vanilla and salt mixing until incorporated. add the eggs one at a time until just combined. be careful not to over mix. over mixing once the eggs are added introduces more air into the batter, which makes it more crack-prone once baking.
- stir 2 C of cream cheese mixture into the pumpkin mixture.
- pour most of the cream cheese mixture into your cake pan. use a spoon to dollop the pumpkin mixture all over. top with a few spoons of cream cheese mixture. use a butter knife to swirl everything together in figure 8 patterns. if you over-swirl, you will end up mixing everything together. you really just want the top to look pretty.
- put the cake in a large, shallow roasting pan, and fill with 2-ish inches of boiling water. bake for 55 minutes to an hour (or more if needed) until the cake is set with a slightly wobbly center. turn off the oven and crack the door, letting the cake sit for an hour. remove from oven (at this point i removed took the cake out of the water bath and removed the foil) and chill on the counter top for another hour. you will see the cake shrink slightly away from the sides of the pan. after the hour I removed the sides of the pan and put the cake in the refrigerator for 3 hours until we sang happy birthday.
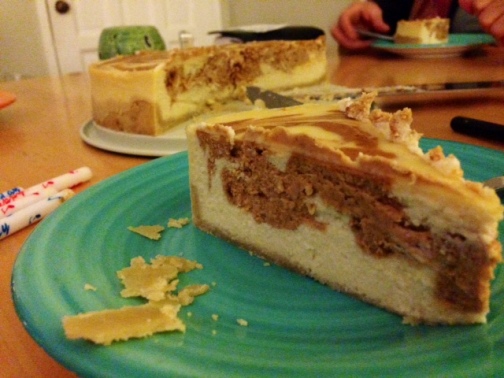
the cake was a great success. I loved the crust so much that I may use it for pie at some point, I wish it was thicker than 1/4 inch. The cake itself was great and not overly sweet, but I would have liked more of a pumpkin flavour (yes, flavour with a ‘u’). I think more spices and perhaps more pumpkin puree would have done a nice job. In fact, some cinnamon in the crust would have been great. I’ve also got some leftover filling since my pan was small than 10″, so perhaps mini cheesecakes are on the way.